
Stop DMing People Manually: My Step-by-Step ManyChat Setup (With Every Screenshot)

If you've ever posted "comment GUIDE and I'll send it to you" and then spent the next two hours copy-pasting the same DM to every single person… this one's for you, friend.
This week I set up my first real ManyChat comment-to-DM automation — live on screen, mistakes and all — and I'm handing you every click, every setting, and the one gotcha that almost broke my button. Screenshot by screenshot.
Here's my belief, and it's the reason I automated in the first place: your time is a stewardship. Every hour you spend copy-pasting DMs is an hour you're not creating, not coaching, not resting, not present with your people. If a tool can handle the repetitive delivery while you handle the relationship, that's not laziness. That's wisdom.
What this automation actually does
Mine runs on my Tuesday Instagram post. A follower comments VOICE, and this is what happens — automatically, in seconds:
They get a friendly public reply on their comment ("Sent! Check your DMs").
They get an opening DM: "Hi friend! Your VOICE Framework guide is ready — tap below and I'll send it right over" with a Send me the guide button.
When they tap the button, they get the DM with a link: "Here's your VOICE Framework guide. Enjoy!" with a Get Your Free Guide button.
Once they click on Get Your Free Guide button, they are then taken to my free guides page, where they enter their email address to receive the guide. This is part of my lead generation framework.
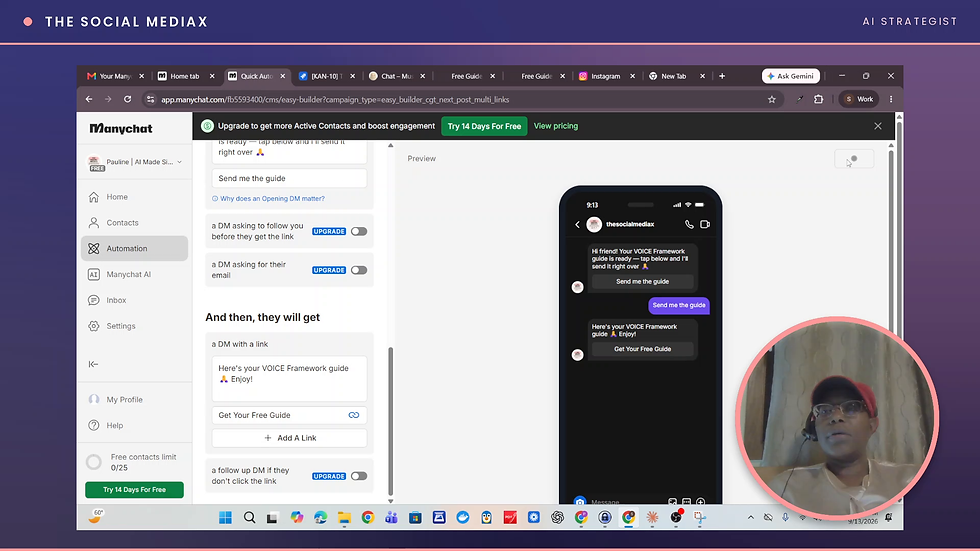
The whole thing runs on ManyChat's free plan. No paid upgrade required. Let me show you how.
Before you start: what you need
A free ManyChat account (sign up at manychat.com — it takes two minutes)
An Instagram Professional account (Creator or Business) connected to a Facebook Page
One freebie page URL (mine is my free guides page — more on why in Step 12)
Your keyword (mine was VOICE; keep it short, memorable, and tied to the post)
The setup, step by step
Step 1 — Create your free ManyChat account
Head to manychat.com and sign up on the free plan. You'll get a magic link by email. Done in two minutes.
Step 2 — Skip the integrations you don't need
During onboarding, ManyChat asks "Which tools are you using right now?" — showing options like Kit, ActiveCampaign, Mailchimp, Flodesk, and others.

Here's the thing: my email tool is MailerLite, and it wasn't even listed — and there was no “none” option. So I just picked Google Sheets as a placeholder and moved on. Don't let this step stall you — you can connect the tools you actually use later.
Step 3 — Pick "Send A Link From Comments"

Step 4 — Connect your Instagram
Go to Settings → Channels and connect your Instagram account (@thesocialmediax, in my case). Heads-up: your Instagram must be a Professional account and it must be linked to a Facebook Page — that's Meta's requirement for the connection itself. (Facebook Messenger is a separate channel you'd connect on its own under Settings → Channels.) The connection runs through Meta's login, so the page owner (you) has to do this one yourself. It took me under a minute.
Step 5 — Name your automation clearly
I name every automation after its keyword: "VOICE keyword — comment to DM." When you have three of these running (VOICE, REPURPOSE, LOG — like I do now), future-you will be grateful.
Step 6 — Choose your post (or wait until it's live)
The trigger is "When someone comments on a specific post or reel." Here's a lesson I learned the behind-the-scenes way: my Tuesday reel wasn't published yet when I built this, so the post picker was empty. Leave the post selection alone, publish your post, then come back and select it. The automation won't fire until it's linked to a live post — which is actually a nice safety net.
Step 7 — Set your keyword
Under "And this comment has," choose "a specific word or words" and type your keyword. Mine: VOICE. Set the match to "contains" so it catches the keyword even if someone writes "VOICE please!" — and it's case-insensitive, so "voice" and "Voice" both work.

Step 8 — Write your public comment replies
Turn on "reply to their comments under the post" and write 3 variations so your replies don't look robotic:
"Sent! Check your DMs "
"On its way — check your inbox "
"Just DM'd you the guide "
ManyChat rotates through them. Small detail, big difference in how human your automation feels.
Step 9 — Customize the opening DM
This is the first message your follower receives. Make it warm and specific. Mine:
Hi friend! Your VOICE Framework guide is ready — tap below and I'll send it right over
Then change the button from the default "Send me the link" to something friendlier. Mine: "Send me the guide."
Step 10 — Write the DM with a link
In the "Write a message" box under "a DM with a link," type your delivery message:
Here's your VOICE Framework guide. Enjoy!

Step 11 — Add the link button (watch the 20-character limit!)
Tap Add A Link. This opens a small modal with two fields: Button label and Link.
And here is where I got humbled, live on camera. My first button label was “Get Your Free Guide” with an arrow ➡️ — and ManyChat rejected it because of the character length limit of 20 characters. In this case, the arrow was an extra character that once I deleted it, ManyChats requirement was met.

Twenty characters. That's the ceiling, and emoji count toward it. My fix: "Get Your Free Guide" — 19 characters, fits perfectly. Do yourself a favor and draft your button labels in a notes app and count the characters before you paste.
Step 12 — Paste your freebie page URL
In the Link field, paste your URL. Mine: https://www.thesocialmediax.com/free-guide
And here's the real reason this automation matters: it's lead generation. I link to my email-gated free guides page — not a raw PDF. That makes the value exchange clear: they enter their email address, and I deliver a useful guide created to help them move forward.

Step 13 — Leave the paid toggles OFF
In this template you'll see a few blocks marked UPGRADE (paid plan): "a DM asking to follow you before they get the link," "a DM asking for their email," and "a follow-up DM if they don't click the link." Leave them off. Everything above works beautifully on the free plan — keep your money, friend.
Step 14 — Set it LIVE and test it
Hit Go Live. Then — and don't skip this — ask a friend to comment your keyword on the post to test the whole chain. I watched my Insights tab ("No data to show… yet!") turn into real sends and clicks.
What I'd do differently next time
Name every automation by keyword from day one. VOICE, REPURPOSE, LOG — one per post. Searching “Automation #4” at midnight is not the vibe.
Wait until the post is published before selecting it. The post picker only sees live posts.
Draft button labels in a notes app and count characters. Twenty characters. No emoji if it breaks the bank.
Keep Facebook manual (for now). Comment-triggered automation on Facebook requires a paid ManyChat plan. I chose manual replies there instead — my money, my rules.
Your turn
The best way to understand this automation is to experience it. Go find this week's Tuesday post on @thesocialmediax on Instagram, comment VOICE, and watch what lands in your DMs within seconds. Then come back and tell me you're setting up yours.
And if you want help mapping this to your own freebie and your own voice, book a call at thesocialmediax.com — I'd love to walk through it with you.

Making AI make sense for faith-based creators and entrepreneurs — one automation at a time.

Comments